| On this page |
Using a ramp parameter
Houdini support RGB color ramps and floating point (spline) ramps. One varies color along the length of the ramp, creating a gradient, and the other varies a single value, creating curve.

-
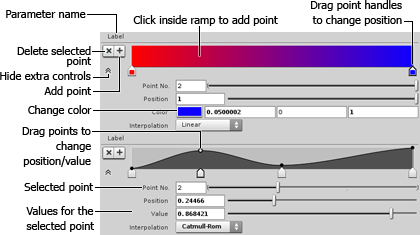
Click one of the arrow-shaped point handles along the bottom of the ramp to select an existing point.
-
Click in the ramp area to create a new point there.
-
Select a point and click the
Delete button to delete it.
-
Drag a point handle left or right to change the point’s position.
-
In a spline ramp, you can also drag the circular value handle up or down to change the point’s value.
-
In a "Hermite" ramp, the curve passes through the odd control points, and then even points control the tangent at the previous point.
-
Use the Position and Value controls below the ramp to edit the selected point’s position and value exactly.
-
Use the Interpolation pop-up menu to control how Houdini fills in the values between the selected point and the next one.
-
Click the
Hide controls button to hide the sliders and show only the ramp.
-
For smooth curves, you should evenly space the control points.
Reading a ramp parameter
Expression language
Use the chramp, chrampt, and chrampf functions to read a value from a ramp parameter in an expression.
To read the value from a ramp at the current time:
chramp(ramp_path, position, component_index)
Where ramp_path is the path to the ramp parameter you want to read, and position is the position along the ramp at which to read the value (from 0 to 1). For color ramps, you must also specify the component_index, i.e. red = 0, green = 1, or blue = 2. For spline ramps, use 0 as the third argument.
chrampt lets you read a value from a ramp at a specific time. chrampf lets you read a value from a ramp at a specific frame.
HOM
To read the value of a ramp parameter:
-
Get a reference to the hou.Parm object representing the parameter.
-
Call the tuple method on the object to get its hou.ParmTuple value.
-
Call one of the eval, evalAsRamp, or evalAsRampAtFrame methods on the
ParmTupleobject to get a hou.Ramp object.
You can also call the parmTemplate method on the Parm object to get a hou.RampParmTemplate object containing metadata about the parameter (i.e. its default values).
# Grab a reference to a ramp parameter.
# This is a hou.Parm object just like any
# other parameter.

>>> r = hou.parm("/obj/my_character/gradient")
>>> r
<hou.Parm gradient in /obj/my_character>

# Get "parm tuple" for this parameter, and
# evaluate it at the current time. Whereas
# evaluating a floating-point parameter would
# return a float value, and evaluting a
# textbox would return a string, evaluating
# a ramp parameter returns a hou.Ramp object.

>>> ramp = r.eval()
>>> ramp
<hou.Ramp is_color=True num_keys=2 ... >

# You can then use the lookup() method to
# get a value from the ramp. This returns
# a tuple or float depending on the type
# of ramp.

>>> ramp.isColor()
True

>>> ramp.lookup(0.5)
(0.1, 0.5, 0.8)
VEX
See ramp parameters on VEX shaders below.
Adding a ramp parameter to a node
The color and floating point ramp parameter types appear in the list of available parameter types when you edit a digital asset definition or directly edit the parameter interface of a single node.

See how to edit a digital asset or how to edit a node’s parameter interface.
Ramp parameters on VEX shaders
In a VOP network
To add a ramp parameter to a shader in a VOP network:
-
Create a
Ramp Parameter node.
-
In the parameter editor, choose the Ramp type (RGB Color ramp or Spline ramp).
-
Connect a float output to the ramp parameter’s input. The input controls the position in the ramp to output.
For example, you could create a
Global Variables node and connect its
soutput to the ramp’s input, so the ramp node’s output varies across the S direction of the surface. -
Connect the ramp parameter node’s output to a Color or Vector input (for the RGB ramp) or a Float input (for the Spline ramp) on another node.

In VEX code
The ramp_rgb and ramp_flt pragmas create a ramp parameter in the UI from three arguments to the shader function.
-
An array of strings representing the interpolation basis between each key.
-
An array of floats representing the position of each key along the ramp.
-
An array of vectors (for a color ramp) or floats (for a spline ramp) representing the value of each key.
In code generated by VOPs, the keys are made linear using spline with the "solvelinear" keyword and the index (in the code below, 0.5), and then the arrays and the "uniform-ized" index are passed to the spline function.
(If in your own code you already are guaranteed to have uniform key positions, you can use "" as the key positions argument to the pragma, and skip the "solvelinear" step and just use the index as the second argument to the outer spline call.)
#pragma ramp_rgb ramp2 ramp2_the_basis_strings ramp2_the_key_positions ramp2_the_key_values
#pragma label ramp2 Gradient
#pragma parmtag ramp2 rampbasisdefault catmull-rom

surface
vopsurface1(string ramp2_the_basis_strings[]={"linear","linear"}; float ramp2_the_key_positions[]={0,1}; vector ramp2_the_key_values[]={{ 0, 0, 0 },{ 1, 1, 1 }})
{
    vector      ramp21;

    // Code produced by: rampparm1
    ramp21 = spline(ramp2_the_basis_strings, spline("solvelinear", 0.5, ramp2_the_key_positions), ramp2_the_key_values);
...